 It is both fun and exciting to have baby chicks in the house. Many first time chick owners fret about what the ideal brooder temperature should be. As the chicks grow and their space needs expand many people wonder when would be the best time for integrating the chicks outdoors with the rest of the flock in the coop. We will be exploring both of these questions in this article.
When deciding on a source for brooder heat you need to think about the air temperature surrounding your brooder. A brooder should be inside to regulate temperature and moisture and to prevent predators from getting at the chicks. Inside means that it can be in a garage, laundry room, shed or barn. It can even be inside of your coop. You will want to have some kind of cover on it to keep out predators. A cookie rack or screen works well.
A newborn chick’s body is covered with down. The newborn will have a hard time controlling it’s own temperature since it does not have real feathers yet. They will warm themselves by huddling close together. Chicks need an additional heat source until their down gives way to hard feathers. Chicks raised by a mother hen will be seen darting in and out from under her wing as they use her body as a heat source. A hen’s internal temperature ranges from 105-107 degrees F.
The rule of thumb is to start your brooder temperature at 95 degrees F (35 C) and reduce it 5 degrees F (3 C) each week until the brooder temperature is the same as the room’s temperature.

This chart from Roberts Farm is a good resource to judge what temperature the brooder should be for how old the chicks are. It also can give you an idea of what age they can transition to the outside according to the outside temperature. For example, if your chick is 6 weeks old, it needs to be at least 65 degrees F for it to be outdoors.
Make sure that your brooder heat source is up and running for at least 24 hours before you introduce chicks to it. Chick brooder temperature is measured with a thermometer placed 2 inches (5 cm) above the brooder floor. You may want to measure it with several different thermometers as sometimes they will each read differently.
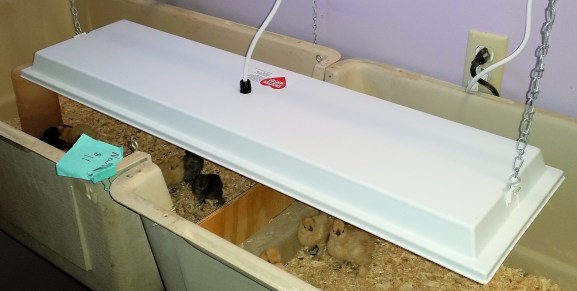
Many people use a brooder heat lamp with a 250 watt bulb. The red heat bulb helps to prevent picking among chicks and can help with night time light. Start by hanging the lamp with an adjustable chain at about 18 inches above the chicks. Don’t rely on the clamp to hold the heat lamp safely. You need to add a chain and hang it from a hook above the brooder. You must take safety precautions when using this type of brooder heater as if they fall they will cause fires. As the chicks grow, you can shorten the chain to decrease the temperature in the brooder.
A heated panel uses radiant heat. It only heats directly below the panel. This makes it easier for chicks to move away from the heat. Ecoglow can have its heat adjusted by lengthening its legs. Sweeter Heaters are hung from above and can be raised and lowered to change temperature. Heated panels are not a fire hazard and will not burn out like a heat lamp bulb could do, which would chill your chicks.
A chick’s body language will tell you whether or not they are too hot or too cold. Chicks that aren’t warm enough will crowd towards the heat source. They will peep shrilly and constantly. Their poo will begin to paste up on their bottoms. Pasty Butt can clog their vents which could lead to death. In an attempt to get warm while they sleep, the chicks could pile up and smother each other. Piling often happens at night when the room temperature drops.
Chicks that are too warm move away from the heat source. They spend less time eating and grow more slowly. They pant and crowd to the edges of the brooder. They keep their heads down and are very quiet. If the brooder is hot enough to raise their internal temperature above 117 degrees F, they will die.
Chicks at the correct temperature are happy chicks. They wander around their brooder making musical sounding noises of contentment. They breathe through their nostrils and do not pant.
Chicks need one half square foot of space each for the first two weeks. They grow fast. You will need to increase the amount of space as they head into three and four weeks of age. You will need a bigger brooder or split the group and get a second brooder. They can be off of the heat lamp when the temperature of the room they are in matches their age on the chart above. Chicks hatched in winter or early spring will need a heat source longer than chicks hatched in late spring or early summer. Larger breeds will be sooner than bantams.
When they are ready to transition outside (They must be feathered out) start by letting them outside during the day. Chicks can be vulnerable to predators such as hawks and the neighbor’s cat so be sure to keep an eye on them. A dog kennel or fencing keeps them protected and doesn’t let them escape. Bring them back inside at night.
If they are too cold outside they will let you know by puffing up their feathers and peeping in a frightened way. Don’t leave them alone as they could become chilled quickly.
Don’t be in a hurry to put them with other adult chickens. Ideally, they should be the same size as the rest of your flock. Pecking order is a real thing and they will be pecked at by the larger birds. Start by having them close together but separated by a barrier. They will be able to see each other but not touch each other. Gradually give them more opportunities to be together. The integration process can take anywhere from a few days to a few weeks.
For tips and tricks for raising outstanding silkies check out our Chicken Learning Center at VJPPoultry.com . VJP Poultry is an NPIP and state inspected hatchery located 30 miles north of St. Paul. We hatch out silkies all year long so we always have stock available. Like us on Facebook to get weekly updates on what we currently have for sale.
Victoria J. Peterson
 It has been said that a good offence is a good defense where frostbite is concerned. There are, in fact, things that can be done before frostbite happens that can prevent this serious damage from occurring.
